Video and Sound Production - Project 1

Video and Sound Production - Project 1
03/09/19 - 16/10/19 (Week 2 - Week 8)
Sia Man Sheng
0333877
LECTURE NOTES
Lecture 3: Types of Shots
This week, we got a lecture on cinematography. Mr Martin briefed us through the different types of shots used while filming.
Types of Shots
- Extreme Wide Shot
- Wide Shot
- Medium Wide Shot
- Medium Shot
- Medium Close Up
- Over the Shoulder Shot
- Close up Shot
- Extreme Close Up Shot
Moving on from that, we also learned about screen direction in which the subject should move in the same/one direction only. There's also a 180 degree rule whereby the camera should stay on a horizontal axis (line of action) and not cross the other side otherwise it'll be disorienting and confusing.
Lecture 4: 3-Act Structure
For this week, we got a lecture on storytelling in film. From this lecture we got to learn and understand about the 3 act structure, which consists of the beginning, middle and end, with two plot points in between.
3 Act Structure
ACT I: Beginning - Introduction of a story, setup
- Plot Point I
ACT II: Middle - Confrontation, rising action, complications
- Plot Point II
ACT III: End - Resolution of problems, answer to obstacles
Lecture 5: Storyboard
This week, we were given a lecture and Mr Martin discussed with us about storyboarding.
INSTRUCTIONS
TUTORIAL
Introduction to Adobe Audition
We were given 7 audio files with the same music but in different equalizer settings. The task for this exercise was to match the sound of the 6 different tracks to the original music through manipulation of Parametric Equalizer.

Figure 2.1 ep 1

Figure 2.2 ep 2

FIgure 2.3 ep 3

Figure 2.4 ep 4

Figure 2.5 ep 5

Figure 2.6 ep 6
Telephone Sound Effect
Mr. Razif was firstly taught us on how to transform a conversation into the sound effect of voice come form old phone. Increase the treble and lowering the bass has success transformed it into the sound effect come from old phone. But with further adjustment by lowering the audio quality through reducing of mid range in Paramatic EQ has brings out more characteristic of a old phone.
Audio 3.1 Source Audio

Figure 3.3 lowering the gain of H point (telephone)

Figure 3.4 lowering the bass as the bass of telephone is very limited (telephone)

Figure 3.5 This is to achieve the effect of older phone (telephone)

Figure 3.6 Lowering the maximum amplitude to avoid sound to be louder (telephone)
Walky-Talky Sound Effect
From the sound effect of telephone, we can modify it into talky-talky sound effect with the manipulation of gain and input boost to increase the distortion.

Figure 3.7 Increasing the Gain (Walky-talky)

Figure 3.8 Increasing the Input Boost (Walky-talky)
Conversation inside a Closet
We are to create the sound effect of someone is talking inside the closet wit the knowledge we have learnt in the previous 2 exercises.
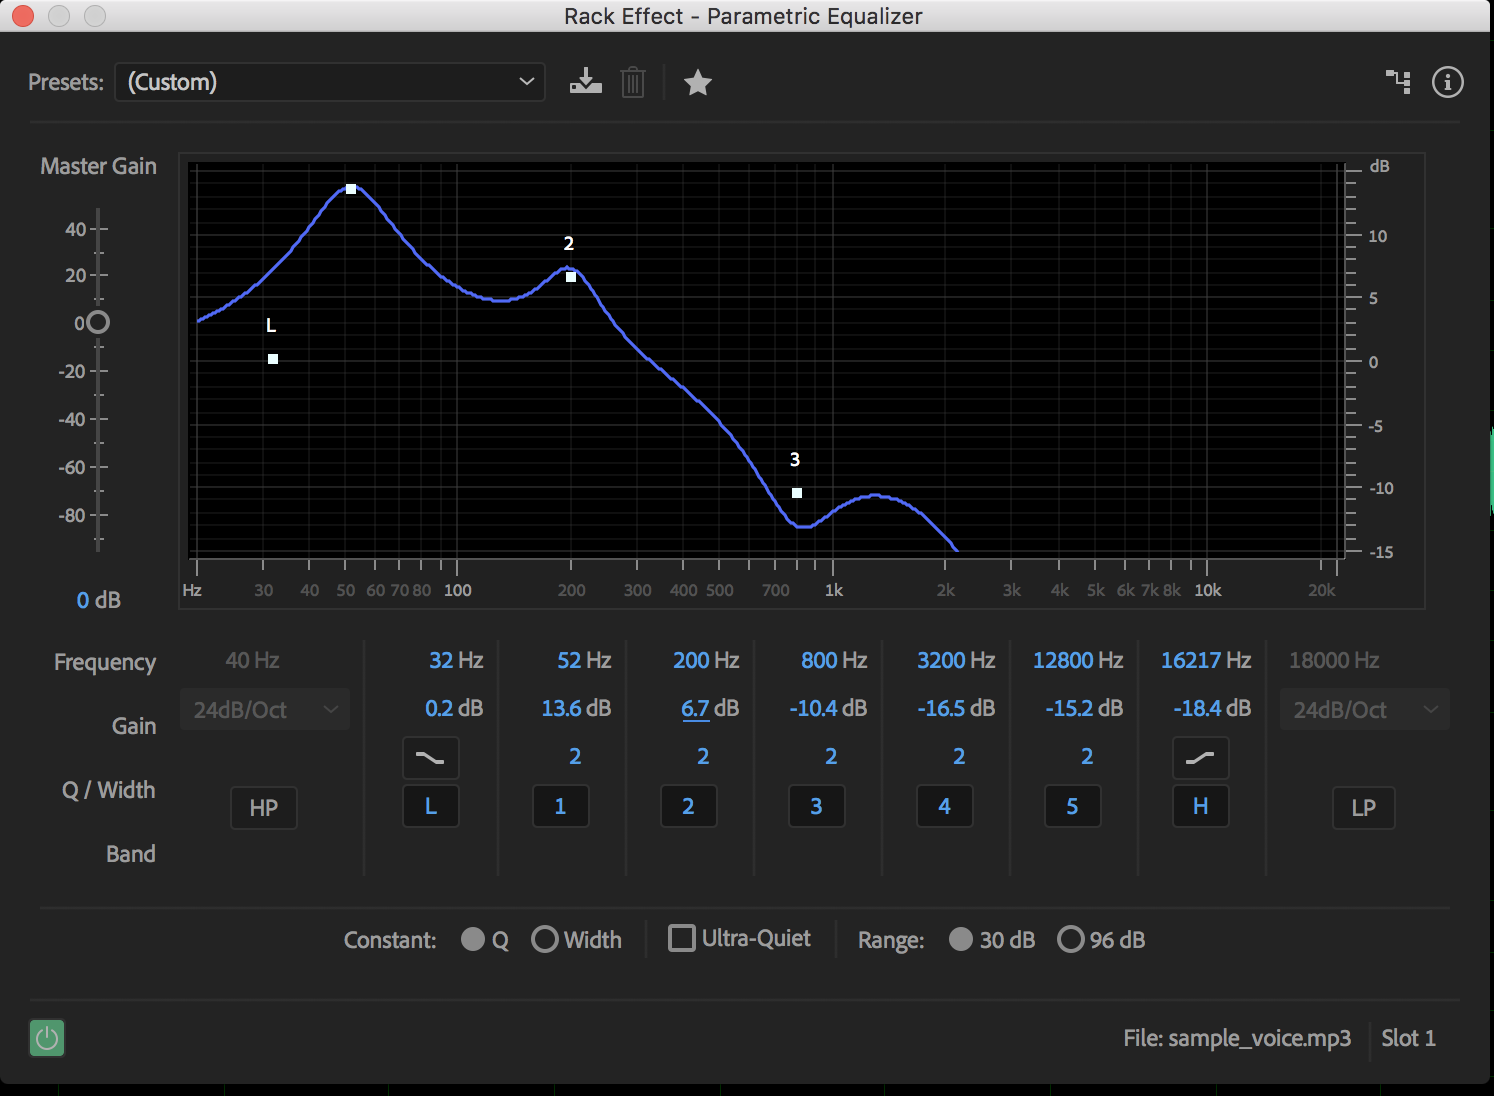
Figure 3.9 Equaliser Adjustment (Inside of a Closet)
One tricky part I have made here is that I want to lower the grain but the volume become lower hence, I increase the input boost to bring back the volume.

Figure 3.9 Hard Limiter Adjustment (Inside of a Closet)
Stadium Announcement (Indoor)
In this exercise, I have decided to create a sound effect inside a indoor stadium. Below are adjustment done in Adobe Audition. Another thing we learnt is to add echo using the "Echo"and "Delay" effect within the Rack Effects.

Figure 3.10 Equaliser Adjustment (Indoor Stadium)

Figure 3.11 hard Limiter Adjustment (Indoor Stadium)

Figure 3.12 Echo Adjustment (Indoor Stadium)

Figure 3.14 Reverb Adjustment- based on thickener (Indoor Stadium)
EXPLOSION SOUND EFFECT
Techniques that are encouraged to apply while editing audio:
- Layering: is taking 2 or more sounds to combine them together.
- Time-stretching: is a technique in which allows audio widths to be stretched.
- Pitch-shifting: is the ability to change the pitch of a sound without changing its actual length. Lower pitch make the audio sound bigger, more bass, lower pitch. High pitch makes thin sound,
- Reverse: is another layer that overlapping with the original audio to create a weird sound / initial / ending sound. It is to fix what the original audio file lack of.
- Mouth it: occurs when you cannot artificially achieve the outcome you want and it is the easiest way to get sound effect if you are an expert.
Audio 4.1 Explosion (Original Audio)

Figure 4.1 Adjustment done in Parametric EQ

Figure 4.2 Adjustment done in Parametric EQ

Figure 4.3 Adjustment done in Rack Effect
Audio 4.2 Explosion (Parametric EQ)

Figure 4.4 Adjustment done in Reverb Effect
Audio 4.3 Explosion (Stretched & Reverb)
Audio 4.4 Explosion (Reversed)

Figure 4.5 Cliping

Figure 4.6 Fixed Clipping through Hard Limiter
After applying multiple effects and going through edits and feedback from Mr. Razif, this is the final edit for the explosion sound effect
Audio 4.5 Explosion (Final Outcome)
PROJECT 1- PUNCH
For the first project, Mr. Razif assigned the class to make an edit for a series of punches using a given single file of the original punch audio to begin with. We were to combine different audio techniques we learned from the previous exercises into use.In the beginning of this project, I began to edit the original punch sound effect to make it more realistic and enhancing on the impact sound. From there I have further developed 2nd and 3rd punches from 1st edited audio with different characteristic and variation. For the 4th, which is the strongest punch, I have added "echo" and "delay" for it to create the slow motion feeling. Overall, there is a increase strength from 1 to 2 but decrease at 3 and finally come out with the strongest punch. Objective of doing so is to give a storyline when the person's take a break at 3rd punch in order to increase strength on final punch. It also increase contrast to the final punch as there is more different.

Audio 5.1 Multitrack for 1st punch


Audio 5.2 Adjustment of Parametric EQ & Rack Effect
Audio 5.1 Punch (1st)

Audio 5.2 Punch (4th)


Audio 5.5 Adjustment in Hard Limiter

I have use the 1st edited file for 2nd and 3rd punches. The different is that I applied pitch-shifting to create variation and give different characteristic to it.
Audio 5.3 Punch (Final)


Comments
Post a Comment